How Photos Affect SEO and 4 Steps to Fix it
Improving Search Engine Optimization is one of those elusive elements we all want to do but sometimes we just don’t know the steps to take to actually do it.
Well, let me tell you, if you have photos anywhere on your site or blog, then this post is for you.
Let me break down 3 major ways that photos play a vital role in your online presence, specifically on your website and how you can improve your SEO by doing a few easy steps that will boost SEO optimization and web performance.
Search Engine Optimization is effected by a lot of factors including keywords, layout and design of your site, usability and so much more.
But today we'll go over how photos play their own role and how much they can influence SEO performance.
1. File size
We’ve all been there. We land on a site and that little pinwheel comes up meaning the page is trying to load.
Believe it or not, that right there can be a detriment to your SEO. According to Google
“Images often account for most of the downloaded bytes on a web page"
Meaning, the images are most often the culprit for long loading time. Google goes on to say “as a result, optimizing images can often yield some of the largest byte savings and performance improvements for your website.”
Not only are large image sizes a problem for SEO, it seems that they annoy us too.
In a recent survey, it was discovered that “75% of visitors won’t return to a site if it takes more than 4 seconds to load.”
That could be a ton of potential customers that will never give you another chance if you don’t improve your page loading speed, which can be done by optimizing your images - more on that later.
2. Naming your images matters
Most of the major search engines are text-based, i.e they can not read images and videos. So when you upload an image and it's named "IMG0234_" it's not helping you at all and you're wasting your chance for Google to "read" the image.
Naming your files is as easy as saying “first-year-birthday-party-photoshoot.” The trick is to use keywords and descriptive text to explain the photo.
BUT you also want to make sure to NEVER ‘stuff’ keywords such as “baby-babybirthdayshoot-photographer-babyphotographer-babybirthdayphotographer” etc.
Name your files descriptively and use keywords naturally and in short sentences. No capitals necessary.
3. Quality photos matter
One factor of a website’s performance is based on the bounce rate.
A bounce rate is the percentage of visitors who, after viewing only a single page of a site, navigate elsewhere.
Having a high bounce rate indicates that a site is boring or not engaging. The goal for any website is to have a low bounce rate, meaning visitors take time to look around and travel from one page to the next.
A high or low bounce rate is not the end-all-be-all when it comes to site performance but a sure way to decrease the bounce rate is to include captivating and intriguing photos. Likewise, a sure way to make a site boring is to use mediocre images.
There are many other ways to improve SEO for your site but these are the key ways to improve when it comes to the photos you’re putting on your site: Shrinking the file size, naming the file with keywords and using quality photos.
Enough of how photos can affect SEO, let's talk about how to make your photos SEO-friendly.
4 Steps to Optimize Your Images
You can start improving your photos today by following 4 simple steps.
NUMBER 1: REDUCE IMAGE SIZE
You want to keep your images around 300 KB or below. 500 KB is OK, but the lower the better. If you’ll notice most photos from the camera can be large, like 25 MB, which is huge. So to reduce the file size follow these 4 steps.
Starting off in Photoshop, you will select "Image size"

Then you will make the longest side 1200 pixels.

Click OK.
NUMBER 2: SAVE FOR WEB
Then go to File --> Export --> Save for Web.
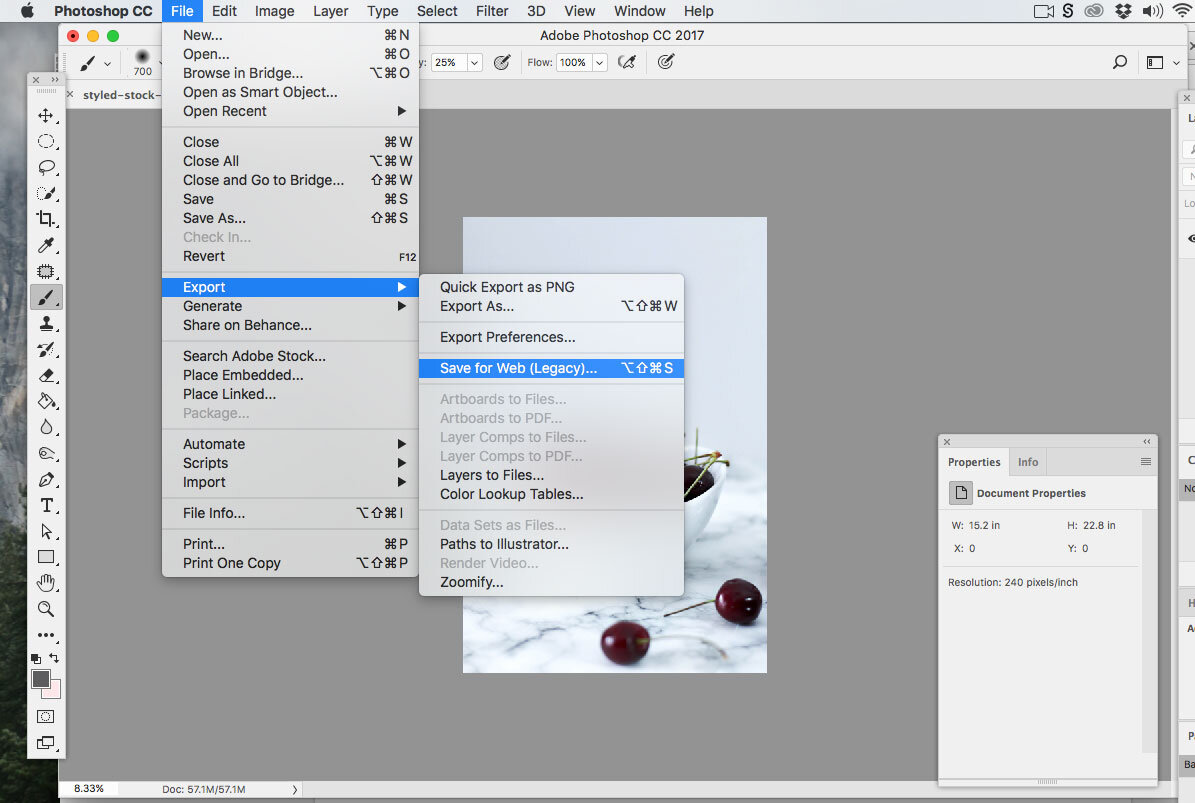
Once you're inside there, you'll choose "High" and quality "60." Obviously the higher the quality the larger the file. "60" most often will give you great image quality but I don't recommend going lower than that.
Then below you can see what our file size will be (circled below).

NUMBER 3. NAME FILE USING KEYWORDS
When you save, use keywords such as feminine-styled-stock-photo (or something descriptive). Note: You don't need to capitalize anything.

NUMBER 4. USE AN IMAGE OPTIMIZER
Another way to reduce a file is to use an image optimizer such as ImageOptim, a free tool you can download from online. It reduces your file size about 3% but every little bit helps.
Some other image optimizers like this one allow you to compress files up to 50MB. And another tool I use is Lightroom where you can choose to custom export your images and choose your image quality.
Want to know how to improve other aspects of your photos?
I'm sharing all my secrets from camera knowledge to styling, shooting, editing and more.
Let me know if these tips help you!
I would love to hear if saving files or reducing image size has ever been an issue for you.